Increase WIFI signal / range using Windsurfing

|

Increasing WIFI signal / range

One of my friend had a problem with her WIFI signal... she's experiencing a very low signal on her PC located at the 2nd flr. while the router is located at the 1st. She wanted to increase the WIFI signal without spending a lot of cash, I did some research and found a simple Do-It-Yourself thing. I was able to increase the WIFI-signal from the Router and the WIFI-reciever(LAN) as well.

Make sure you have the ff:
- Aluminum foil
- Folder (or any type of thin carton for easy cutting & bending later)
- Glue (I want a short drying period so I decided to use rugby instead)
- Scissor

Now follow the video (tutorial) below...

TUTORIAL

or try one of this vid...

video 1, video 2, video 3, video 4, and video 5


I was able to increase the WIFI signal from "very low" to "good" level...
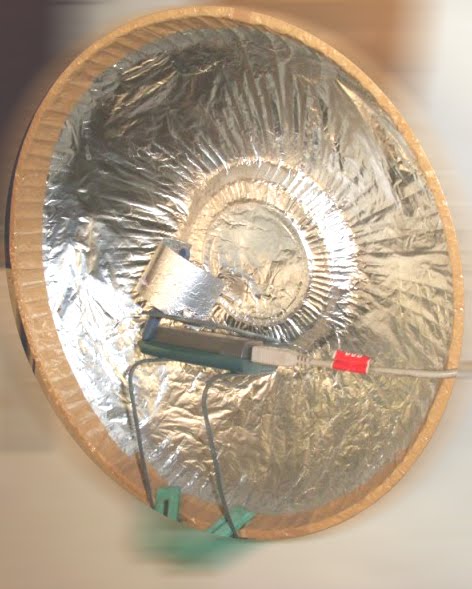
Below is my WIFI-windsurfing version.
I use Electric-fan cover as the Sattelite-dish and covered it with foil...

Prototype - Scan Water Tower with HELI

|

Have you ever played the "Prototype" game on your PC and got stuck on the mission where you need to scan an infected water tower with heli?

Here's the solution... ^^

First Solution:
-Just go to My Documents\Prototype and delete profile.bin. It just contains the settings, the next time you make a change to the game's settings and save it it'll be recreated, if you're worried about it just rename it instead of deleting it so the game doesn't find it. I guess we somehow messed up our settings after all.

*** OR ***

Second Solution:
- After install
Mouse buttons would swap around ie, assigning Right-click MB would show up as Left-Click MB.
Certain Default Key Maping for Alex, APC and Heli would be missing, eg, consume wasn't assigned a key
Can't quick-change or enter/exit units or buildings because [Press Key] would show no button to actually press and so on...
Basically, what I discovered was an issue with "older mice" with the lack of functionality screwing up the auto mapping of keys during setup, meaning some older mice, trackballs and cheap end mice don't work so well and in some cases * up the key-mapping assignments, and this applies to many older gamepads too ...
Luckily I had an MS Wireless Optical 3 button wheel mouse - I was previously using a 2 button Logitech trackball and was getting all the above - but I installed the MS Mouse, rebooted the game (after deleting the profile.bin) and everything auto-mapped as it should have from the beginning. Not many will have this problem just those using basic or older 2x button mice/trackballs ... a newer mouse or trackball with the three button+ features will fix this problem.
Hopefully that'll help whomever else is having this annoying issue.
- Basically, get yourself an up to date mouse. I just used my brother's mouse for a little while, and I've managed to do the mission with no problems, plus all the keys are mapped correctly as well.

How to play online with Call of Duty 4 - Modern Warfare

|

How to play online with Call of Duty 4 - Modern Warfare

People are asking me how to play online with Call of Duty 4 - Modern Warfare, so I decided to make a guide for you guys... ^_^

1. Get a copy of "Call of Duty 4 - Modern Warfare"

2. Download the "Call of Duty 4 - Modern Warfare Patches (usually patches 1.6 & 1.7)

-----------------------------------------------------------------
Call of Duty 4: Modern Warfare v1.4 Patch

Call of Duty 4: Modern Warfare v1.5 Patch


Call of Duty 4: Modern Warfare v1.6 Patch


Call of Duty 4: Modern Warfare v1.7 Patch
-----------------------------------------------------------------

3. Download the "PunkBuster setup"

-----------------------------------------------------------------
For Windows

For Linux

For Mac OSX
-----------------------------------------------------------------

4. Install "Call of Duty 4 - Modern Warfare" (during installation, make sure to include "PunkBuster")

5. Install "Call of Duty 4 - Modern Warfare Patches (EXAMPLE: patch 1.6 then patch 1.7)

6. Launch the downloaded "PunkBuster setup"
- under GAME tab, select the "Call of Duty 4" or "Call of Duty 4 - Modern Warfare"
- under GAME PATH tab, click "Browse" to look for the game (usually C:\Program Files\ActiVision\Call of Duty 4 - Modern Warfare)
- click "ADD GAME", once added...click "CHECK FOR UPDATES" (wait for the update to finish)

7. Launch the "Call of Duty 4 - Modern Warfare: Multiplayer"
- click "JOIN GAME"
- on the upper part, under SOURCE tab... select "Favorites"
- on the upper-right part, click "New Favorite"
- now type-in the IP address of the game-server you like to join (To get an IP address of public COD4MW game-server, go to www.game-monitor.com or www.espgl.com ...select the nearest game-servers to your location)
- once the new IP address is entered, it will be saved on the "Favorites" (You can add IP addresses as many as you want)
- double-click any of the IP address added to play/join that server

8. Your done, enjoy!

Call Of Duty Modern Warfare 2 Tips / Intel

|

Museum bonus level
---Successfully complete the game to unlock the Museum bonus level. Go to the single player missions, select the new "Museum" mission at the bottom, and choose a difficulty. When the level begins, it is recommended you first study the layout. Get two weapons, and max out your ammunition through the crates supplied. Go to the desks by the entrance to the rooms. On the desks there is a red bell that is labeled "Don't Press". Once you press this button, enemies will begin coming to life in one room area at a time. About thirty people (all characters from the game) will try to kill you. You will hear a sound once that wave is completed. There are two waves of kills needed to complete it. Note: There are three rooms, one of which nothing happens in. Do not bother shooting anyone prior to using the bell, as it will not count.

Extra Custom Class slots
---Reach Level 70 in Multiplayer mode to unlock Prestige mode. Reach the indicated Prestige level to unlock the corresponding Custom Class slot.
Sixth Custom Class slot: First Prestige
Seventh Custom Class slot: Second Prestige
Eighth Custom Class slot: Fourth Prestige
Ninth Custom Class slot: Seventh Prestige
Tenth Custom Class slot: Tenth Prestige

Professional perks
---Successfully complete the indicated task to unlock the corresponding Professional perk:

>Bling Pro: Get 200 kills while using a weapon with two attachments. Its effect is two primary weapon attachments and two secondary weapon attachments.
>Cold-Blooded Pro: Destroy 40 enemy Killstreak rewards while using the Cold-Blooded perk. Its effect is undetectable by UAV, air support, sentries, and thermal imaging; and no red crosshair or name when you are targeted.
>Commando Pro: Get 20 melee kills while using the Commando perk. Its effect is increased melee distance and no falling damage.
>Danger Close Pro: Get 100 kills with explosives while using the Danger Close perk. Its effect is increased explosive weapon damage and extra air support damage.
>Hardline Pro: Get 40 Killstreaks while using the Hardline perk. Its effect is that Killstreak rewards require one less kill and Deathstreak rewards require one less death.
>Lightweight Pro: Run 30 Miles while using the Lightweight perk. Its effect is move faster and quick aim after sprinting.
>Marathon Pro: Run 26 Miles while using the Marathon perk. Its effect is unlimited sprint and climb obstacles faster.
>Ninja Pro: Get 50 close range kills while using the Ninja perk. Its effect is invisible to heartbeat sensors and silent footsteps.
>Scavenger Pro: Resupply 100 times while using the Scavenger perk. Its effect is resupply from dead enemies and extra magazines.
>Scrambler Pro: Get 50 close range kills while using the Scrambler perk. Its effect is jam enemy radar near you and delay enemy claymore explosions.
>Sitrep Pro: Destroy 120 detected explosives or tactical insertions while using the Sitrep perk. Its effect is detect enemy explosives and tactical insertions and louder enemy footsteps.
>Sleight Of Hand Pro: Get 120 kills while using the Sleight Of Hand perk. Its effect is faster reloading and aiming.
>Steady Aim Pro: Get 80 hip fire kills while using the Steady Aim perk. Its effect is increased hip fire accuracy and longer hold breath duration.
>Stopping Power Pro: Get 300 Kills while using the Stopping Power perk. Its effect is extra bullet damage and extra damage to enemy vehicles.


Multiplayer weapons and equipment
---Reach the indicated level in Multiplayer mode to unlock the corresponding item:

Assault rifles
FAMAS: Level 1
M4A1 carbine: Level 4
SCAR-H: Level 8
TAR-21: Level 20
FAL: Level 28
M16A4: Level 40
ACR: Level 48
F2000: Level 60
AK-47: Level 70

Handguns
USP .45: Level 1
.44 Magnum (Colt Anaconda): Level 26
M9: Level 46
Desert Eagle: Level 62

Launchers
AT4-HS: Level 1
Thumper x2 (M79 grenade launcher): Level 14
Stinger: Level 30
Javelin: Level 50
RPG-7 x2: Level 65

Light machine guns
L86 LSW: Level 1
RPD: Level 4
MG4: Level 16
AUG HBAR: Level 32
M240: Level 52

Shotguns
SPAS-12: Level 1
AA-12: Level 12
Striker: Level 34
Ranger: Level 42
M1014: Level 54
Winchester 1887: Level 67

Sniper rifles
CheyTac Intervention: Level 1
Barrett .50 caliber (M107): Level 4
WA2000: Level 36
M21 EBR: Level 56

Submachine guns
UMP .45: Level 1
MP5k: Level 4
Vector: Level 12
P90: Level 24
Mini Uzi: Level 44

Secondary weapons
PP-2000 machine pistols: Level 1
Glock 18: Level 22
M93 Raffica: Level 38
TMP: Level 58

Other
Frag grenade: Level 1
Semtex: Level 1
Throwing knife: Level 7
Tactical insertion: Level 11
Blast shield: Level 19
Claymores: Level 31
C4: Level 43


Kill Streak Bonuses
---Get the indicated number of consecutive kills in Multiplayer mode to get the corresponding bonus:
UAV: 3 (reveals enemies on mini-map)
Care Package: 4 (ammo or killstreak air drop that can be collected by anyone)
Counter UAV: 4 (disables enemy radar)
Predator: 5 (guided missile)
Sentry Gun: 5 (airdropped weapon)
Precision Airstrike: 6 (select a location to bomb)
Attack Helicopter: 7 (helicopter backup)
Harrier Strike: 7 (select a location to bomb and defend with a Harrier)
Emergency Airdrop: 8 (four ammo or killstreak air drops that can be collected by anyone)
Pave Low: 9 (armored helicopter backup)
Stealth Bomber: 9 (undetectable airstrike)
AC-130: 11 (operate a plane gun)
Chopper Gunner: 11 (operate a helicopter gun)
EMP: 15 (disables enemy electronics)
Tactical Nuke: 25 (kills everyone)

Sniper Camouflage
---Successfully complete the "Ghillie In The Mist" challenge in Multiplayer mode with the indicated number of one-shot kills with sniper rifles to unlock the corresponding Ghillie camouflage suit:
Arctic camo: 50 one-shot kills with sniper rifles
Desert camo: 200 one-shot kills with sniper rifles
Urban camo: 100 one-shot kills with sniper rifles


Intel Locations
---Search the indicated locations to find all 45 Intel laptops:

Act I: S.S.D.D.
1. The Intel is under the watch tower, straight across from the entrance to the obstacle course.

Act I: Team Player
2. The Intel is in a classroom. Someone will announce "I think I saw one go in that classroom", and your team will go in. It is on the right wall as you enter, on a desk by the barrels.

3. As you exit the school, it is on a crate directly outside, next to a taxi.

Act I: Cliffhanger
4. Directly in front of you when Soap tells you to go ahead alone is a guard tower. Go up the ladder to find the Intel on the catwalk.
5. When you are about to enter the building with Soap, go to the previous building in the alley where the Jet is inside the hanger. Break out the window to find the Intel inside.
6. During the snowmobile sequence, when you are approximately 1850m from the finish, stop. Look for a small wooden fence surrounding some trees in the middle of the path in front of you, and a small wooden building up a hill to the right. The Intel is on the ground inside the fenced area with trees. Just run over the Intel to pick it up.

Act I: Takedown
7. Using the map, go towards the south-west corner when you enter the favela. You should find a motorcycle leaning against a building. In front of it, there is a building with an angled wall and a large window in the wall. Go through the door to the right of that window to find the Intel inside.
8. When you go through the alley and see the building with the ladder on the wall, go up it and through the door. The Intel is on a table inside.
9. Directly across from the previous Intel is a building with a small set of wooden stairs. There are a few guys inside you have to kill. The Intel is inside the building on a nightstand next to the bed.
10. Towards the end of the chase, off an alley, go in the building on the right side of the path. Go downstairs to find the Intel between two beds.

Act II: Wolverines!
11. The Intel is on the counter in the gas station after you go through the alley.
12. The Intel is inside CRB Financial (across from Nate's Restaurant), near the front door, under a sign labeled "Online Banking".
13. The Intel is on a table inside Taco To Go. Enter the building through the blown up corner.
14. The Intel is inside a dumpster (in a small brick enclosure) on the east side of Burger Town. It is visible from the Burger Town roof ladder.

Act II: The Hornet's Nest
15. Near the beginning, after you move forward from the first building, go inside the house to the right of where Soap stops in the road (there is a blue car in the garage). Go past the blue car and into the kitchen to find the Intel on the table.
16. After clearing the small lot (has a bunch of appliances and cars), instead of going right up the stairs between buildings, go left around the three-story house (floors are colored red, yellow, red), and look in the little hut attached to its side to find the Intel on some barrels.
17. As you move up the sloped street, there is a blue car on the right side of the street. In the building on that side is the Intel up on the second floor on the table.
18. When you enter the last open lot and are supposed to go up on the roof, turn to the right, and look in the window behind the goal fence to find the Intel inside a window.

Act II: Exodus
19. In the apartment office, near where the enemies are first repelling in from a chopper. It has red walls and blue curtains inside. The Intel is on the desk.
20. In the right-side building of the structure that forms an arch over the road (has toll booths), on a desk directly to the right as you enter.
21. After you cross the bridge, go into the second house on the right side of the street. Enter from the front door, then go to your right and up the stairs. The Intel is on a yellow couch above those stairs.

Act II: The Only Easy Day... Was Yesterday
22. In the room before you go back outside (shortly after breaching), the Intel is on one of the metal racks against the wall.
23. After executing "Plan B", in the room Soap goes into on the right, the Intel is on a metal rack inside the door.
24. After clearing outside, when the team starts going up the stairs, enter the room to the right (you were probably in this building before when you were told to take cover), and look under the stairs on some wooden palettes to find the Intel.

Act II: The Gulag
25. As your team moves towards the arch with the red light, go to the stone stairs before it, and look inside the room on the far wall to find the Intel on some filing cabinets.
26. The Intel is on a desk behind the large wall of monitors you encounter on your way through.
27. After you get the riot shield and leave the room where you got it, turn left, and go down the hallway. In the first open cell on the right-side wall is the Intel on a desk.
28. Once you find the person you have been looking for, turn to your left to find the Intel on the desk.

Act II: Of Their Own Accord
29. Inside the elevator that keeps trying to close (in the hallway after you enter the building), the Intel is to the right of the body sitting inside.
30. In the room with a balcony (out on the balcony is a missile launcher), go to your left as you enter the room, and enter the door straight ahead (near the portrait of Franklin Pierce) to find the Intel on a table down a small hallway.

Act III: Contingency
31. When you reach the three-man patrol standing near the fence, kill them, and go over to where they were. The Intel is about ten feet south on a crate.
32. The building labeled "33" along the angled south-west fence contains the Intel on a metal desk inside the northern door.
33. Just north of building "33", locate the stairs leading to a helipad (has blue lights on the corners) to find the Intel in the north-west corner.

Act III: Whiskey Hotel
34. When you are told to go left to the building, inside that building after the next door has been opened, the Intel is in the hallway on a couch to the left.
35. After you go up the first stairs towards the roof, the Intel is to your right on a desk. This should be about the time when the you see the flares get lit.

Act III: Loose Ends
36. Before entering the house, go behind it, and locate the small boat hanger along the shore. The Intel is on a crate outside of it.
37. In the locked room on the top floor of the house, the Intel is on a desk in front of the door.
38. In the nearest locked room in the basement, go into the arms room to the left. The Intel is straight across from the wall of weapons on a crate.

Act III: The Enemy of My Enemy
39. The Intel is immediately to your right when you begin the mission, in the front of the plane.
40. After you slide out of the plane hull and move across the street and up the hill, look for the plane pointing towards the road. The Intel is inside, near the cockpit.

Act III: Just Like Old Times
41. As you enter the tunnels, go left as instructed. After the patrol passes, kill the guard standing at the monitor, and go straight across to find the Intel on a crate just to the right of the cave entrance.
42. The Intel is to the left on a desk right before you go outside from the tunnels.
43. After going across the ridge, the Intel is in an alcove, on a crate.
44. The Intel is on the desk with soda cans after you breach the room, near where your ally is working on the computer.

Act III: Endgame
45. The Intel is at the beginning of the mission, before you board the vehicle.
NBA 2K10 cheats / cheat codes

|

2K Sports team

Enter "2ksports" as a code to unlock the 2K Sports team.
2K Sports China team

Enter "2kchina" as a code to unlock the 2K Sports China team.
NBA 2K development team

Enter "nba2k" as a code to unlock the NBA 2K development team.
Visual Concepts team


Jerseys

Enter "vcteam" as a code to unlock the Visual Concepts team.
Alternate jerseys

Enter "classicthreads" as a code to unlock alternate jerseys.
Blazers "Rip City" jersey

Enter "ycprtii" as a code to unlock the Blazers "Rip City" jersey.
Grizzlies, Hawks, Mavericks, and Rockets secondary road jerseys

Enter "eydonscar" as a code to unlock the Grizzlies, Hawks, Mavericks, and Rockets secondary road jerseys.


ABA ball

Enter "payrespect" as a code to unlock the ABA ball.

NBA 2K10 Review

|

I know most of the game enthusiast are blown by the good graphics and gameplay that NBA 2K9 provided, and after taking over last year game charts... 2K Sports is now back with one of the most anticipated game of the year, the NBA 2K10. First thing I noticed was the game menu, it was presented with different animation and some are NBA highlights :) Pretty neat right?

(click image to enlarge)

Game Introduction on the court are appealing as well, each team and their star player/s has their own style which makes it more fun to watch... like when Shaq shoot his teammates like bowling pins, vujacic giving Koby a hug, Dwight throw some robot moves and Lebron playing with some hand powder.

(click image to enlarge)

Now let's proceed to the gameplay. 2K Sports added a lot of signature moves and style to each player that makes 2K10 the best basketball game on PC and other console. I've been playing 2K9 a lot but the thing I noticed with 2K10 is the tighter defense... you wont get to the basket that easy using spin move or cross-over like in 2K9 which is nice with 2K10. There are times that players are also interacting with people on the sideline after a hard drive to the basket. Alley-oop, dunks/follow-up dunks are also eye-popping and fun to watch, especially when the commentators/host goes crazy about it providing more realistic gameplay. Wide variety of camera angles and occassional news around the league are also added to the game. Regarding with Online features, they adopted most of the 2k9 features.

(click image to enlarge)

(click image to enlarge)

2K Sports introduce "MY PLAYER" mode in this game. In "MY PLAYER" mode, you'll be able to create your own player by adjusting from physical attributes to skills/moves you want your player to have. As you play through it, your player will be invited by different teams for assessment. The skills improvement of your player will depend on how you pass, how you choose your shot selection and steals... generally said, its how you play. If any of the team that invited your player saw some potentials, you'll be on the NBA court in no time... but of course, you'll start as bench player like everybody else. Simply put, this is your CAREER MODE.

(click image to enlarge)

Also, 2K Sports added a "Reel Maker" feature, a tool where you can create or edit your own Reel/Highlights from your saved replays and share it with your friends by uploading.

(click image to enlarge)

The few glitch that i noticed on this game was, some of the replay (like the replay on "JORDAN player of the game" after a match-up), the background were off and out of sync as the camera zoom-in and out... so the result, the audience are bigger than the players and players are out of the court :( Check some snapshots I took below.

(click image to enlarge)

(click image to enlarge)

Other than that, all replays are gorgeously fine. Second glitch is when the referee took 3x handing-over the ball for an inbound pass before it was caught by the player. Though you rarely see this glitch, I found it annoying sometimes. I think by this time 2K Sports has already released a patch for the said glitches.

So considering all this, I'll give 2K10 a 9 out of 10 rating ^_^
This game really is worth a try... a good job 2K Sports.

Video Conversion / Converting Tool

|

Sorry for the delay, been busy for the past few weeks. Ok, lets proceed.

I'll introduce you to one of the best video conversion tool. Based on my opinion and review, this is simply the best so far... the ImTOO MPEG Encoder Platinum. What i like about it is that it's user-friendly, easy to use and it support wide variety of video and audio file-types. You can convert any video optimized for your DVD/VCD player, iPod, iPhone, Apple TV, Mobile Phone, PS3, PSP, Windows Mobile, HD Video, Xbox/Xbox360, Portable Media (Zune, Creative Zen Vision, iRiver PMP-100, Archos) even Pictures and Animation. You can easily select what type of video output and for what player (see image below).

(click image to enlarge)

This Software also support multi-Core CPU which makes the video conversion much quicker. In my case, I have a Dual-Core CPU (see image below).

(click image to enlarge)

You can even set how many CORE/s you want to use. Lets assume that you have a Quad-Core CPU and you only want to utilize 3 of them so you can use the remaining 1 to another application you are running. Go to "Tools" button, select "Preferences" then choose "Convert" tab. Set the CORE value to 3 (see image below).

(click image to enlarge)

Another good feature of ImTOO MPEG Encoder Platinum is the clip tool... you can choose one or more segments, or even several crossed segments, and then convert them to individual file respectively, or merge them to one file. Moreover, you can also convert video file to various audio formats. You can convert a portion/video to any of the ff:

---------------------------------------------
***General Video***
ASF - Advanced Streaming Format
AVI - Audio-Video Interleaved
DivX Movie
DVD - MPEG2 PS Format
DV - Digital Video Format
MOV - QuickTime
MP4 - MPEG-4 Video
MPEG-1 Movie
MPEG-2 Movie
MPEG-4 AVC Video Format
RM - RealVideo
Super VideoCD - MPEG2 PS Format
Video CD - MPEG2 PS Format
VOB - MPEG2 PS Format
XviD Movie

***General Audio***
AAC - Advanced Audio Coding
AC3 - Dolby Digital AC-3
SUN AU Format
M4A - MPEG-4 Audio
MP2 - MPEG Layer-2 Audio
MP3 - MPEG Layer-3 Audio
OGG - Ogg Vorbis Audio
RA - RealAudio
WAV - Waveform Audio
WMA - Windows Media Audio
AIFF - Audio Interchange File Format

***iPod***
iPod (320x240) MPEG-4 Excellent
iPod (320x240) MPEG-4 Mini
iPod (320x240) MPEG-4 Normal
iPod touch MPEG-4
iPod touch MPEG-4 480P
iPod touch MPEG-4 Extra
iPod touch MPEG-4 Wide Screen
iPod touch MPEG-4 (320x240)
iPod touch MPEG-4 (480x320)
iPod Video2 for TV
iPod Video2 (640x480) MPEG-4 Normal
iPod Video2 (640x480) MPEG-4 Mini
iPod Video2 (640x480) MPEG-4 Excellent

***iPhone***
iPhone MPEG-4 480P
iPhone MPEG-4 Extra
iPhone MPEG-4 Video
iPhone MPEG-4 Wide Screen
iPhone MPEG-4 (320x240)
iPhone MPEG-4 (480x320)

***Apple TV***
Apple TV h264 (320x240)
Apple TV h264 480P (640x480)
Apple TV h264 720P (1280x720)
Apple TV MPEG-4 High 480P (640x480)
Apple TV MPEG-4 Normal 480P (640x480)
Apple TV MPEG-4 Low 480P (640x480)

***Mobile Phone***
3GPP - 3rd Generation Partnership Project
3GPP2 - 3rd Generation Partnership Project 2
BlackBerry AMR Audio
BlackBerry 3GP Video
BlackBerry AVI Video
BlackBerry MPEG-4 Video

***PS3***
PS3 Video 1080P MPEG-4
PS3 Video 720P MPEG-4
PS3 Video 480P Excellent MPEG-4
PS3 Video 480P MPEG-4

***PSP***
PSP - PSP MPEG-4 Video
PSP AVC Video Format
PSP AVC Video (480x720)
PSP MPEG-4 Video - Excellent Quality
PSP MPEG-4 Video - Minimal Size
PSP Video(480P) MPEG-4

***Portable Media***
Zune MPEG-4 Video
Zune MPEG-4 AVC Video Format
Zune WMV - Windows Media Video
Creative Zen Vision Video
iRiver PMP-100 Video
Archos AV500/GMini402 Video
Archos AV700 Video

***Windows Mobile***
Dell Axim X51 Video
Dell Axim X51v Video
General Pocket PC Video
General Pocket PC-Excellent Quality Video
General Pocket PC-Minimal Size Video
HP iPAQ hw6500 series Video
HP iPAQ hx2000/rx3000/rx1900 series Video
HP iPAQ hx4700 series Video

***Picture and Animation***
FLV - Flash Video Format
Picture - BMP Format
Picture - GIF Animation Format
Picture - JPEG Format
Picture - PNG Format
SWF - SWF Format

***HD Video***
HD ASF Video
HD AVI Video
HD H.264 Video
HD Quick Time Video
HD MPEG2 Video(*.mpeg)
HD MPEG2 Video(*.mpg)
HD MPEG2 TS Video
HD MPEG4 Video
HD H.264/MPEG-4 AVC
HD MPEG4 TS Video
HD VOB Video
HD WMV Video

***Xbox Video***
Xbox MCE HD WMV Video
Xbox360 HD H.264 Video
Xbox360 HD MPEG4 Video
Xbox360 HD VOB Video
Xbox360 MCE HD ASF Video
Xbox360 MCE HD AVI Video
Xbox360 MCE HD MPEG2 Video(*.mpeg)
Xbox360 MCE HD MPEG2 Video(*.mpg)
Xbox360 MPEG2 1080pTV Movie
Xbox360 WMV 1080pTV Movie
Xbox360 MPEG4 Video
Xbox360 WMV Movie
Xbox360 H.264 Video
Xbox360 MCE AVI Video
---------------------------------------------

For advance users, you can set more video properties like interlace (see below). Otherwise, leave it on default settings.

(click image to enlarge)

Antivirus for USB flash drive/disk or thumb drive/disk on the go

|

Did some research and found this ClamWin Portable Antivirus that can be included/extracted/installed to your USB flash drive/disk... you can scan your USB flash drive/disk anywhere even the PC you plugged into. What makes this ClamWin Portable Antivirus stand-out is that it is FREE and updatable anytime. ClamWinPortable is a stand-alone program that can be saved to your USB flash/thumb drive without installing it to your PC also.


ClamWin Portable Additional Description: (from www.portableapps.com)
ClamWin Portable is the popular ClamWin antivirus packaged as a portable app, so you can take your antivirus with you to scan files on the go. You can place it on your USB flash drive, iPod, portable hard drive or a CD and use it on any computer, without leaving any personal information behind.

Features:
ClamWin is a Free Antivirus for Microsoft Windows. It provides a graphical user interface to the Clam AntiVirus engine. It features:
--- High detection rates for viruses and spyware --- Regular virus database updates. ClamAV team regularly updates virus databases to include a new virus/variant immediately after it appears --- Standalone Virus Scanner
Please note that ClamWin Free Antivirus does not include an on-access real-time scanner, that is, you need to manually scan a file in order to detect a virus or spyware. Also, ClamWin Portable has scheduled scans and updates disabled as they are not used in a portable scenario.

How to install ClamWin Portable on your Portable Drive:
Just download the portable package at the top or click HERE, then double-click it. Select the location or the portable drive/USB drive you wish to install to and click OK. A PortableClamWin directory will be created there and all the necessary files installed are inside it.

I tried it on my USB flash disk and it works great on any PC, i was able to update it as well. Launch the ClamWinPortable.exe inside the PortableClamWin folder then click the update button to have the latest updates and virus definition/library.

Scanned it with Bitdefender Total Security '09, Superantispyware Pro, Trojan Remover and Spyware Doctor with Anti-Virus... it's 100% clean, nice work ClamWin ^_^

I also added autorun features on my USB flash drive with ClamWin Portable Antivirus so I can scan immediately once my USB flash/thumb drive is connected to any PC. (See image below)
Enjoy a Clean and Portable Antivirus on the go!
Visit PortableApps.com for more info

What kind of memory do i have in my computer / pc?

|

If you are looking to upgrade the memory in your computer, you are probably wondering what type of memory is already installed, and what you need to buy for an upgrade...

Here’s an option for detecting the type/size of memory already installed in your system without having to open your computer. This Tool is also helpful so you can easily check other specification on your system.

Download "System Information for Windows Tool" HERE... or visit their site.

This useful free application/tool should be a standard in any geek’s toolkit. It comes bundled as a single file, no installation required.

Once you open it up, navigate to Hardware and then Memory on the left-side panel, you’ll see what type of memory is already installed in your computer.

See pic below, looks like my DESKTOP system can support up to 4GB of memory and I got a total of 1.5GB memory already installed. I have two memory module... on the first slot, I have 1GB DDR2-667 module and 512MB DDR2-667 module on the second slot.

CLICK THE IMAGE TO ENLARGE

This tool also lets you know that you need the SODIMM form factor memory if you run it on LAPTOP...it shows 1GB DDR2-533 SODIMM memory module.

CLICK THE IMAGE TO ENLARGE

How to remove | Removing trojan.dropper/sys-nv virus

|

I got infected with trojan.dropper/sys-nv virus last week. Superantispyware was able to remove the infection, but everytime I reboot my pc...the virus keeps coming back trying to run itself or infect my system files so the Superantispyware keeps detecting/blocking and cleaning the same virus over and over, arghh! The other partitions on my hard drive which are my backup got infected too thats why formating all of it is not an option for me :)

I had a hard time looking for a simple solution on the internet since most of the things i found was too complicated like editing a lot of stuff on the registry system which got me worried since it can make your system unstable with one mistake. After trial and error with different antivirus, only KASPERSKY ANTIVIRUS 2009 was able to capture this virus. So I decided to post an easy way on how I cleared the virus and fixed the side effect on the registry.

1. First, download the trial version of KASPERSKY ANTIVIRUS 2009 and free SUPERANTISPYWARE.
2. Install both KASPERSKY ANTIVIRUS and SUPERANTISPYWARE.
3. Make sure you update both with the latest virus definitions from their respective sites.
4. Launch the SUPERANTISPYWARE and go to Preferences and select the Scanning Control tab, check the ff boxes like shown on the image below then click Close.
5. Run a full/deep scan using both KASPERSKY ANTIVIRUS and SUPERANTISPYWARE at the same time on ALL hard-drives/partitions.

5.
Wait for both application to finish scanning, after it...
>> I. You will notice that KASPERSKY found the ff:
---------- a .CMD file on each root directory of ALL the hard-drives/partitions (this are the infected files).
---------- GBM6N.EXE files (this file is the culprit and the one that keeps placing the trojan.dropper/sys-nv on your system).
>> II. and SUPERANTISPYWARE found:
---------- trojan.dropper/sys-nv (trojan placed by GBM6N.EXE)
---------- adware.vundo variant (I keep detecting this together with trojan.dropper/sys-nv so I'm assuming that this is also with trojan.dropper/sys-nv or GBM6N.EXE)

6.
KASPERSKY will prompt that it automatically delete all the GBM6N.exe and .cmd files after scanning.
7. SUPERANTISPYWARE will also remove the trojan.dropper/sys-nv and adware.vundo variant
8. SUPERANTISPYWARE will ask you to restart your PC... but first, make sure that KASPERSKY already deleted all the GBM6N.exe and .cmd files
9. Restart your PC...
10. Use the search tool on your pc to look for any file that has GBM6N on the filename (on my case,I found several GBM6N-prefetch files)... DELETE those files.
11. Restart your PC again...
12. Notice that when you click any of your drive, it doesnt open and will just show an "open with" window. Don't panic, all your files are still inside :) ...that's only the side effect of the virus we cleared a while ago.
13. Now to fix this "open with" issue... download the FixDrive-Tool HERE, this tool will fix your system registry that causes your drives/partitions not to open.
14. Once downloaded, unzip the file and extract the contents (FixDrive.exe and readme.txt) to a folder
15. Click the extracted FixDrive.exe to run the program.
16. Select the drive-letter from the list that exhibiting the problem then click Fix.
17. Your done... :D

Call Of Duty 4 Modern Warfare Glitch Compilation

|

Compiled this to give you some advantage on COD4... enjoy!


OLD SCHOOL:


MAP: AMBUSH


MAP: BLOC


MAP: CRASH


MAP: BACKLOT


MAP: SHOWDOWN


MAP: STRIKE


MAP: VACANT


MAP: WETWORK


MAP: CREEK (OLD and NON-OLD SCHOOL)


MAP: CHINATOWN


MAP: KILLHOUSE


NON OLD SCHOOL:

MAP: AMBUSH


MAP: crossfire and BACKLOT


MAP: BACKLOT


MAP: CROSSFIRE
This tutorial will show you how to get on almost every rooftop and out of the map crossfire. All of these glitches are done in non old school and with only one person. You will need an RPG and the Juggernaut perk. Remember to comment, rate and subscribe. More vids to come.


MAP: BLOC


MAP: COUNTDOWN


MAP: CRASH


MAP: DISTRICT


MAP: DOWNPOUR


MAP: OVERGROWN


MAP: PIPELINE


MAP: VACANT


MAP: CHINATOWN


MAP: KILLHOUSE


More Than 2,000 Movies on a Single DVD Disc

|

Courtesy of Yahoo News:

PARIS (AFP) - - Scientists unveiled new DVD technology on Wednesday that stores data in five dimensions, making it possible to pack more than 2,000 movies onto a single disc.

A team of researchers at the Swinburne University of Technology in Melbourne, Australia, used nanotechnology to boost the storage potential nearly 10,000-fold compared to standard DVDs, according to a study published in the peer-reviewed journal Nature.

"We were able to show how nanostructured material can be incorporated onto a disc in order to increase data capacity, without increasing the physical size of the disc," said Min Gu, who lead the team.

Discs currently have three spatial dimensions. By using gold nanorods Gu and colleagues were able to add two additional dimensions, one based on the colour spectrum, and the other on polarisation.

Because nanoparticles react to light depending on their shape, it was possible to record information in a range of different colour's wavelengths at the same physical location on the disc.

Current DVDs record in a single colour wavelength using a laser.

The fifth dimension was made possible by polarisation. When light waves were projected onto the disc, the direction of the electric field within the waves aligned with the gold nanorods.

"The polarisation can be rotated 360 degrees," explained co-author James Chon.

"We were, for example, able to record at zero degree polarisation. Then on top of that, were able to record another layer of information at 90 degrees polarisation, without them interfering with each other," he said in a statement.

The researchers are still working out the speed at which the discs can be written on, and say that commercial production is at least five years off.

They have signed an agreement with Korea-based Samsung, one of the world's largest electronics manufacturers.

Last month, US technology giant General Electric said its researchers had developed a holographic disc which can store the equivalent of 100 standard DVDs.

Dual-layer Blu-ray discs hold the equivalent of 10 standard DVDs.


Thermalright CPU | VGA | MEMORY Fanless Cooler

|

Lots of CPU and VGA cooler are now being released on the market but here are some heatsink/cooler that stand on the crowd. Thermalright is one of the top CPU and VGA cooler on the market, what makes it different is its capability to dissipate heat even without fan... you heard it right "without fan". That means that you can have a quiet and 0dB environment without sacrificing your computers temperature. Here are some pictures using Thermalright heatsink for each component.

click on the images for higher resolution

CPU: Thermalright IFX-14 with 120mm fan and backside heatsink
MEMORY:
2 Thermalright HR-07 type L
VIDEOCARDS:
2 Thermalright VGA heatsink with fan
(fans are optional)


CPU: Thermalright HR-01 plus with backside heatsink
MEMORY: 2
Thermalright HR-07 type L and 2 HR-07 type H
VIDEOCARD: Thermalright VGA heatsink
MOTHERBOARD CHIPSET: 2
Thermalright chipset heatsink

CPU: Thermalright IFX-14 heatsink
MOTHERBOARD CHIPSET: 2 Thermalright chipset heatsink

CPU: Thermalright ULTRA-120A heatsink
MEMORY: 2
Thermalright HR-07

not quite sure if this casing is with Thermalright but its a very nice modification anyway...


But that's not all, Thermalright included attacheable clips so you can add any 80mm fan for their VGA heatsink and any 120mm fan for CPU heatsink (see pictures below), several small heatsink for VGA-memory/VRAM are also included together with installation manual for easy referrence. Thermalright also released copper-type heatsink for VGA and CPU.

Thermalright TRUE-copper heatsink for CPU

Thermalright V2 VGA cooler (copper-type heatsink)
80mm fan add-on for VGA heatsink

VGA: VRAM heatsink are also available


Backside heatsink are also available for CPU and VGA making sure that no heat can escape for both (pictures below).

Thermalright HR-11 VGA Backside heatsink

Thermalright IFX-10 CPU Backside heatsink


Top-10 PC cooler by frostytech
click on the image for higher resolution

Using Intel CPU

Using AMD CPU
Click here to see the complete review on Top-10 by frostytech

For More info, visit Thermalright official website

Tekken 6 on PSP

|

Found this on the net... and good news to all gamers!

The high definition and #1 anticipated fighting game Tekken-6 on PS3 and xbox360 was announced today by NAMCO BANDAI Games America Inc. to be released and get squished for portable Playstationing. Yes, you heard it right... Tekken-6 will be released on PSP.

The PSP system version will be essential companion for players who want their fighting skills on-the-go. Unbridled vengeance will be served worldwide this Fall when each version of the game delivers pulse-pounding, edge-of-your-seat action with bone-jarring punches and gut-wrenching grapples.

Tekken-6 will not only contain all the explosive action but also feature additional stages, content, items, and an ad-hoc multiplayer mode. Fighting amongst friends is encouraged as players can battle wirelessly against each other using original or fan favorite characters. Rounding out its list of impressive features is the return of the “Ghost” Infrastructure mode, which allows players to upload their “ghost” character data and download others’ from the Internet onto their PSP system. When players have reached the height of their TEKKEN fighting skills, they will be able to see how they stack up against others through the game’s network support.

Tekken-6 will be optimized for the PSP system. It means that Tekken-6 graphics/features will be adjusted to fit the PSP while maximizing the possible graphics that PSP console can support. Things will be adjusted such as...

-64-bit for PS3/xbox360 will be converted to 32-bit or 24-bit for PSP
-smoke, glare and lighting effects will be reduced
-background details will be adjusted in some ways like removing or reducing some particles
-character details will be altered as well while maintaining the stunning look
-resolution is also reduced to fit PSP screen

I know most of the gamers are dying to see Tekken-6 on PSP so here are some screenshots from PSP courtesy of IGN :)

PSP 2000 vs PSP 3000

|

PSP-3000 support the same games & offers the same media support as the older PSP models but Sony has upgraded the PSP 3000 with an improved LCD screen like increased color range, five times the contrast ratio, half the pixel response time to reduce ghosting and blurring effects, a new sub-pixel structure, a microphone, a new disk tray design, new button designs and logos, and anti-reflective technology to improve outdoor playability.


Silver PSP-3000 (top) compared to white PSP-2000 (bottom)


Here's the official Sony PSP-3000 versus PSP-2000 LCD comparison image


But some LCD screen problems were also found soon after PSP-3000 release. It has been shown that the new screen possesses a new horizontal subpixel structure (visible scanlines), which is thought to be the main contributing factor to the screen's scanline-like appearance. The exact cause of the interlace-style artifacts is unknown, but has been confirmed by SCEI as being an intrinsic characteristic of the new LCD panel.


PSP-2000 and PSP-3000 screen comparison, showing different subpixel structure.


Sony Japan has responded to this criticisms about visible scanlines on the new PSP-3000 systems. While Sony America is looking into the situation, Japan's statement doesn't offer much. It seems that the scanline problem is a feature of the new LCD screens. SCEI says that the "PSP-3000 has a new LCD device with vastly improved picture quality, achieving a more natural and vivid picture than older models...by improving LCD response time to reduce ghosting, the horizontal-line phenomenon becomes more visible."

The worst news is that there's no fix. "Since this is caused by hardware characteristics, there is no plan to fix it with system software update." Looks like it's here to stay. Check SCEA statement below...

SCEA RESPONSE
"On some occasions, scan lines may appear on scenes where brightness changes drastically, due to the hardware features of the new LCD device on PSP-3000. Installed with this new LCD device, PSP-3000 offers more natural and vibrant colors on its screen, but the scan lines have come out to be more visible as a result of improving response time to alleviate the afterimages on PSP-3000. Since this is due to hardware specification, there are no plans for a system software update concerning this issue."

By the way, keep in mind that PSP-3000 screen still has the same size with PSP-2000 ;)

The only PSP-3000 feature that caught my eyes was the new built-in microphone which can be useful to some games especially online. But here's the down side of PSP-3000 for some users when it comes to games... since PSP-3000 comes with firmware ver5.0 or higher and has a new CPU (motherboard revealed to be TA-90v2) which does not support the PRE IPL Exploit used in hacking the previous versions, you wont be able to play "homebrew" games. Homebrew refers to game-emulators or old games that came from PS1 way back up to family computer games... all this old games add more choices to gamers.


psp 2000 (top) and psp-3000 (buttom)


rear view: psp 2000 (top) and psp-3000 (buttom)


psp 2000 (top) and psp-3000 (buttom)


In my opinion, psp-3000 new features did NOT come a long way compared to PSP-2000 since all of them has a down side. About the psp-3000 new look, its like SONY just replaced PSP casing just to have a new look. Honestly, If I really want my PSP-2000 to look good and stand-out on the crowd... I wont buy a default psp-3000 case even if some people on the net already confirmed that psp-3000 case fits psp-2000. But instead, I'll get one of those clear casing (picture below).

PSP-3000 Anti-reflective technology just makes reflection lesser but still exist so I dont think its worth-it to spend more cash and take the hassle just to upgrade/exchange your psp-2000 to PSP-3000... if I were you, I'll buy "Add-on Keyboard for PSP"(picture below) instead.

"Look, who's going to play PSP while under the sun, getting a tan or while walking? ...c'mon! no one, right?? ...well unless you want to be hit by a car or truck while walking and playing PSP :D "


Crystal / Transparent Case for PSP-2000


Add-on Keyboard for PSP


Most of us use our PSP 80% of the time on a vehicle, indoors (school, home, restaurant, coffee shop) or while chillin' with our friends so Im not that die-hard fan of anti-glare feature unless they upgraded the graphics of the PSP not just the LCD display. Most gamers will appreciate PSP-3000 if SONY added right analog-stick instead of built-in microphone :(